Day 3: Prints in Rust

Welcome back, fellow Rustaceans 🦀.
In our last article, we created our first Rust program, learned how to compile and build it with rustc. We also explored how to manage projects effectively using Rust's build system, Cargo. Today, we'll dive into the various ways Rust's standard library helps us with printing and logging. Understanding how to output information is a fundamental step when learning any new language – let's jump right in!
You can find all the code examples we will discuss in the Rust repository on the inpyjama GitHub page: https://github.com/inpyjama/rust/. To run the demo, navigate to the "day3" folder and execute cargo run.
The Print Macros
Let's start with the foundational building blocks of printing in Rust: println! and print!. The println! macro inserts a newline character after printing your message, ensuring subsequent output appears on a new line. Conversely, the print! macro displays your message without any additional newline characters.
println!("Hello, Rust World!");  // Prints with a newline
print!("This stays on the same line "); // No newline
println!("...and now we're on a new line.");
Rust offers a more streamlined approach to output formatting with the println! and print! macros compared to C's printf family of functions. Placeholders within curly braces {} act as locations for inserting variables or expressions. By assigning values to variables and subsequently referencing them within the println! macro using the {} placeholders, you can create dynamic messages. Importantly, Rust's type system and compiler handle the details of formatting these values appropriately. This eliminates the need for users to manually specify format specifiers (like %d, %f in C), reducing the potential for errors and simplifying the process of creating formatted output.
// Formatting with placeholders
let name = "Ferris🦀";
let age = 3;
println!("My name is {} and I am {} years old.", name, age);
Rust leverages the Display and Debug traits to control how data appears in console output. When Rust encounters a placeholder, it looks for an implementation of the Display trait for the corresponding data type. Think of traits as a way for Rust to define behaviour, like how to print a specific type of data. Rust automatically provides Display implementations for basic types like integers, floats, and strings.
For more complex data structures (such as collections like tuples or arrays), Rust cannot directly infer how to display them.
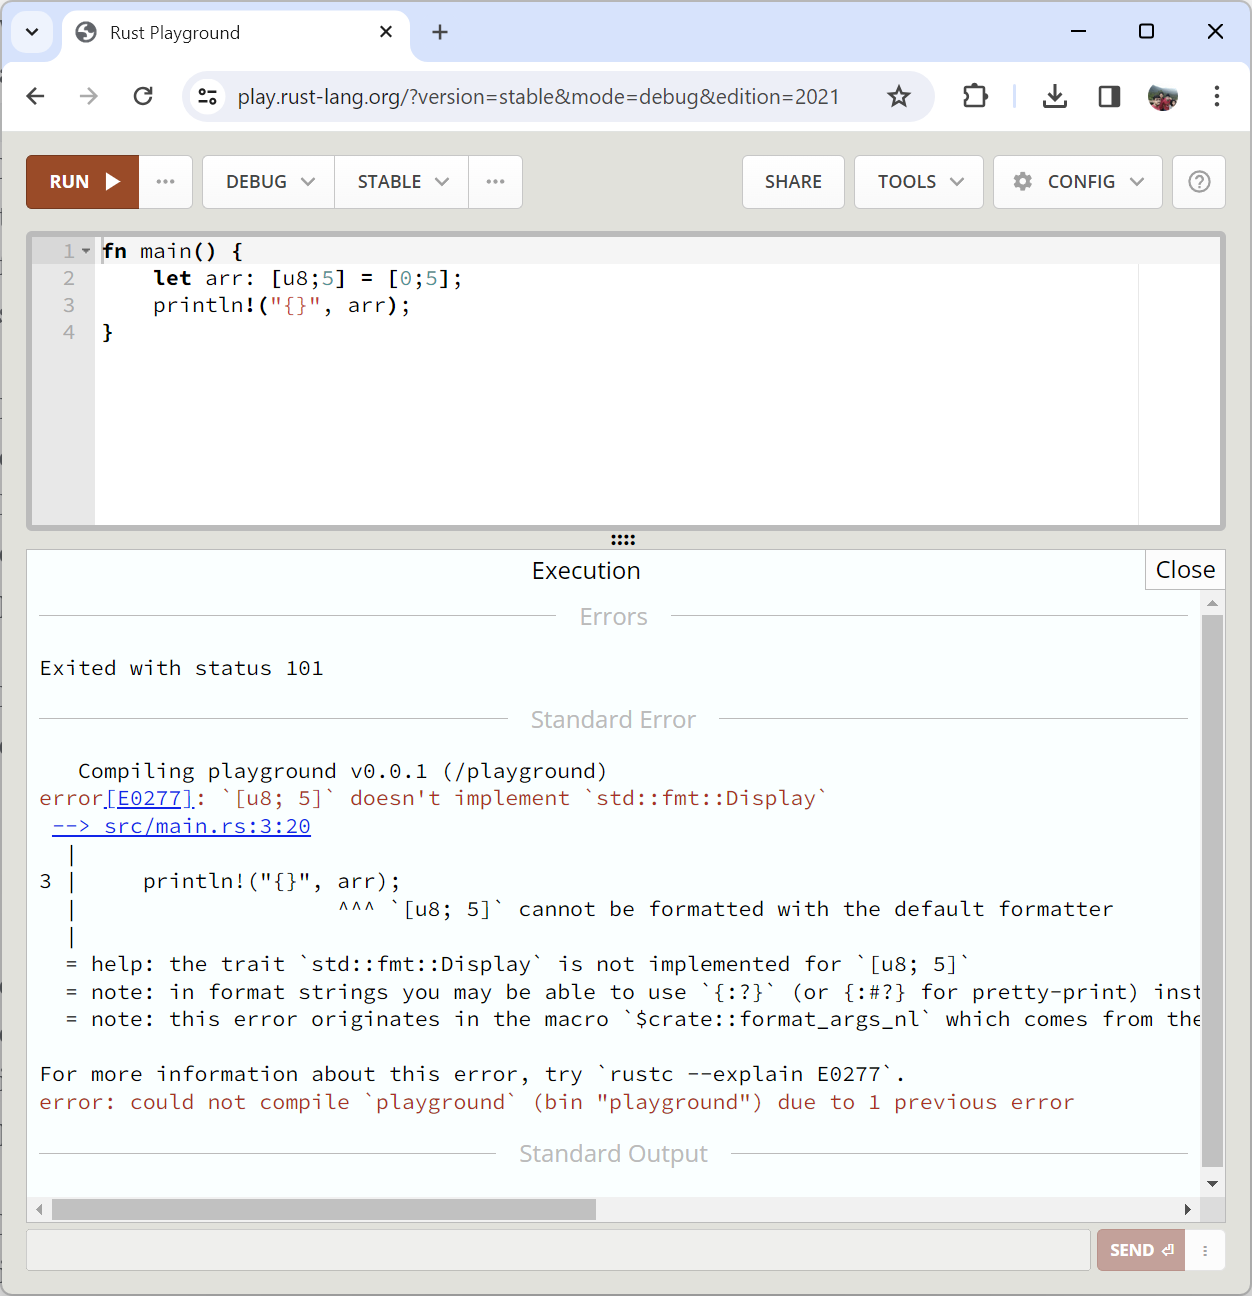
For example, let's look at this code snippet (don't focus on the syntax just yet):
fn main() {
    let arr: [u8;5] = [0;5];
    println!("{}", arr);
}
If you try to print this array directly using the {} placeholder, the Rust compiler will point out an error: "[u8; 5] cannot be formatted with the default formatter". However, the compiler is super helpful and suggests "the trait std::fmt::Display is not implemented for [u8; 5], in format strings you may be able to use {:?} (or {:#?} for pretty-print) instead". This is one of the things I love about Rust – the compiler guides you towards solutions!

Let's try the suggestion: replace {} with {:?} and recompile.
fn main() {
    let arr: [u8;5] = [0;5];
    println!("{:?}", arr);
}
It works! You'll see your array of zeros printed on the console. If you're coming from Python, this might not seem extraordinary, but for embedded engineers, it can be a really exciting feature. Now, let's dive in and understand what's happening behind the scenes.
This is where the Debug trait (fmt::Debug) {:?} comes in. It focuses on providing a detailed, developer-focused representation of a data structure. Many types in Rust can automatically derive a Debug implementation using #[derive(Debug)]. To print in Debug format, use the {:?} placeholder, or use {:#?} for a more structured, pretty-printed output.
If the standard Debug representation isn't ideal, you have the power to customize it by implementing the Display trait for your custom data types. This lets you use the {} placeholder for user-friendly formatting. Don't worry if the concept of traits feels a bit abstract right now. We'll explore traits, including Display and Debug, in more detail soon, including hands-on examples.
Rust offers a variety of formatting placeholders, like {:x} (hexadecimal), {:b} (binary), and {:o} (octal), letting user to represent numerical data in the most suitable format for your project.
println!("Number: {}", 42);
println!("Binary: {:b}, Hex: {:x}, Octal: {:o}", 10, 10, 10);
For precision control over floating-point numbers, Rust allows you to specify the desired number of decimal places using the .precision modifier within the println! macro.
// Precision for floating-point numbers
println!("Pi with 3 decimals: {:.3}", 3.14159);
To make your code more readable, Rust lets you assign meaningful names to values directly within the println! macro. Honestly, I don't know where I will use this but again, I am a punny embedded engineer...
// Formatting with named arguments
println!("{name} says {greeting}.", name="Alice", greeting="Howdy");
Rust also offers features for padding and alignment, which can significantly improve the visual presentation of your output. You can choose from left, right, or centered alignment using formatting specifiers. Padding allows you to add extra space for a cleaner, more polished look.
// Padding and alignment
println!("Right-aligned: {:>10}", "hello");   // Pad with spaces on the left
println!("Left-aligned: {:<10}", "hello");    // Pad with spaces on the right
println!("Centered:     {:^10}", "hello");   // Pad with spaces on both sides
Conclusion
Phew! You might think we've covered most of the formatting features in Rust, but the truth is, we've barely scratched the surface. The Rust std::fmt library offers a lot of options to handle any formatting scenario you can imagine.
That wraps up `day 3` – we've already made great progress in our Rust journey! See you tomorrow where we'll discuss debug and display traits.


Discussion