Hardware development flow using the open-source toolchain for synthesis, place-n-route, and programming of ice40 FPGA. We use Blinky as an example to guide the discussion.
I assume you already know about FPGAs if you are reading this. For those who have no clue what it is, imagine it to be a hardware equivalent of Lego blocks that can be programmed.
FPGAs do not have processor-like machinery. They do not have any instruction set. Just a land of something called "Look Up Tables", "IO Blocks" and "Switching Box". FPGAs are programmed to become a Digital Circuit!
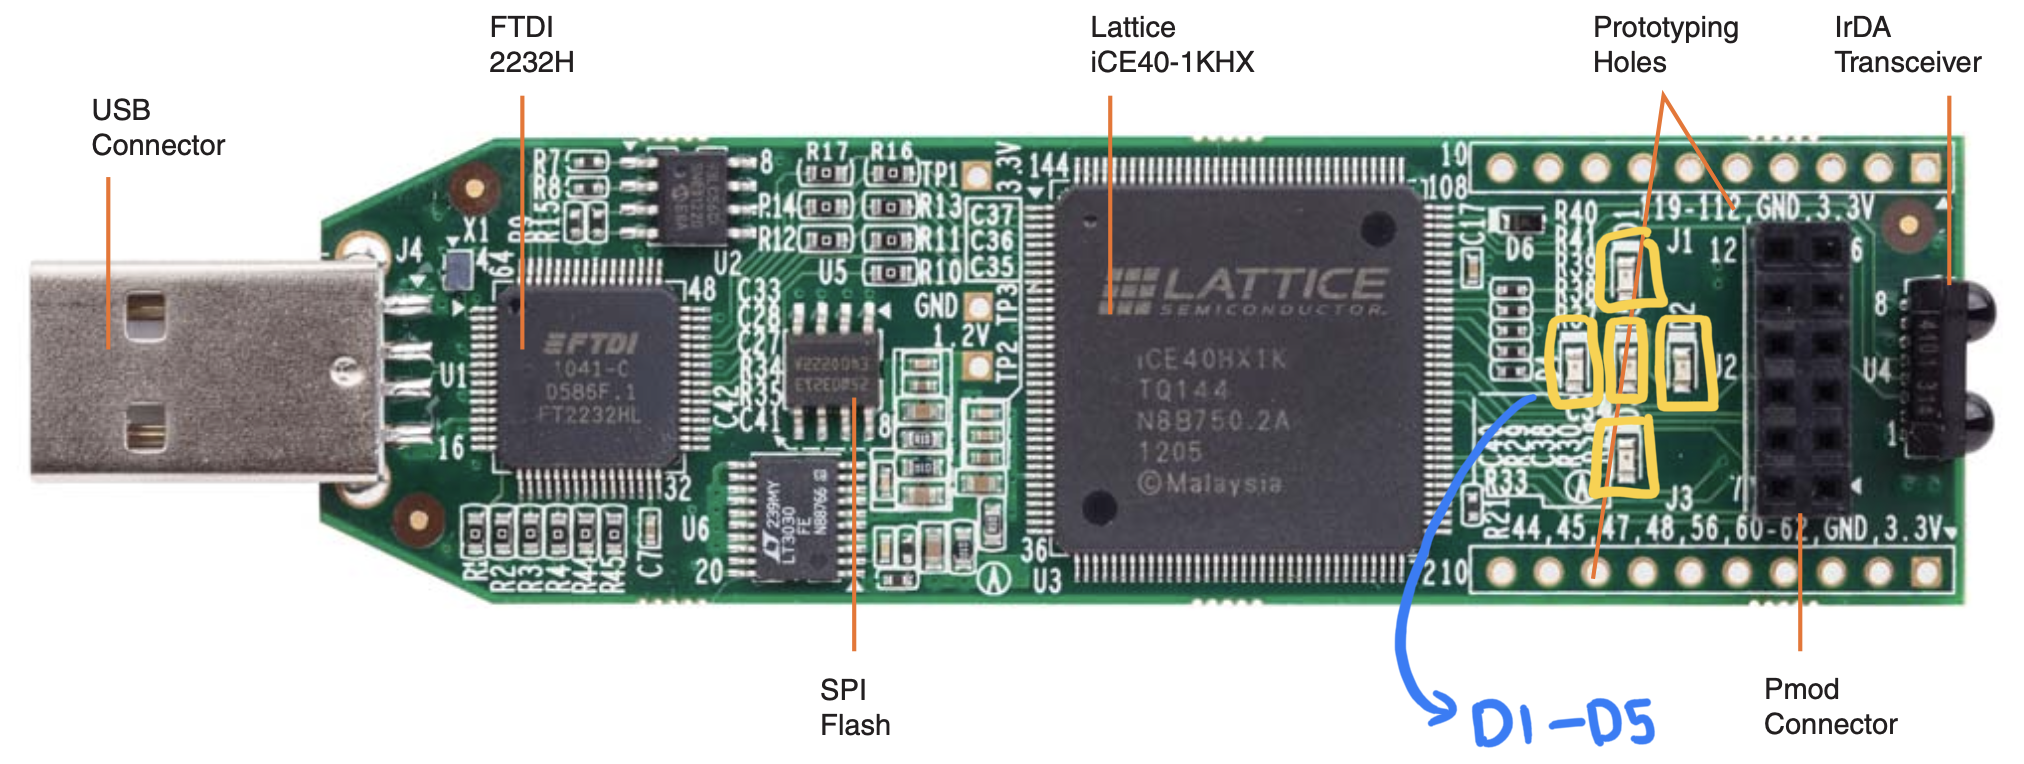
To guide the discussion we will use the iCE40 FPGA from Lattice and the associated open-source toolchain (project icestorm) to program it.
iCE40 FPGA, D1-D5 are five LEDs that we want to blink. This development board is referred to as the "iCEstick".
Some clarification before we move on -
👉
Blinky circuit in the hardware world is equivalent to the Hello, World!in the software world!
Our goal is to blink the Green and Red LEDs (D1 - D5) on the Lattice iCEstick and in doing so, explore the hardware development flow.
Introduction
FPGA-based hardware development is very straightforward -
You describe the hardware you want to make in something called Hardware Description Language (in our case we shall use Verilog. It is just another language used to describe hardware, search more about it if you don't already know...) in a normal text file (ending in an extension .v).
Specify which physical pins of the FPGA are to be associated with the input/output ports used in the code in yet another text file with an extension .pcf, this is called the constraints file. The ping constraint file varies from FPGA to FPGA and the format of specifying the connection vary from toolchain to toolchain.
From the manual of the Lattice iCEstick board, we have the following pin mapping available to us -
Pin mapping of the LEDs.
Development Flow
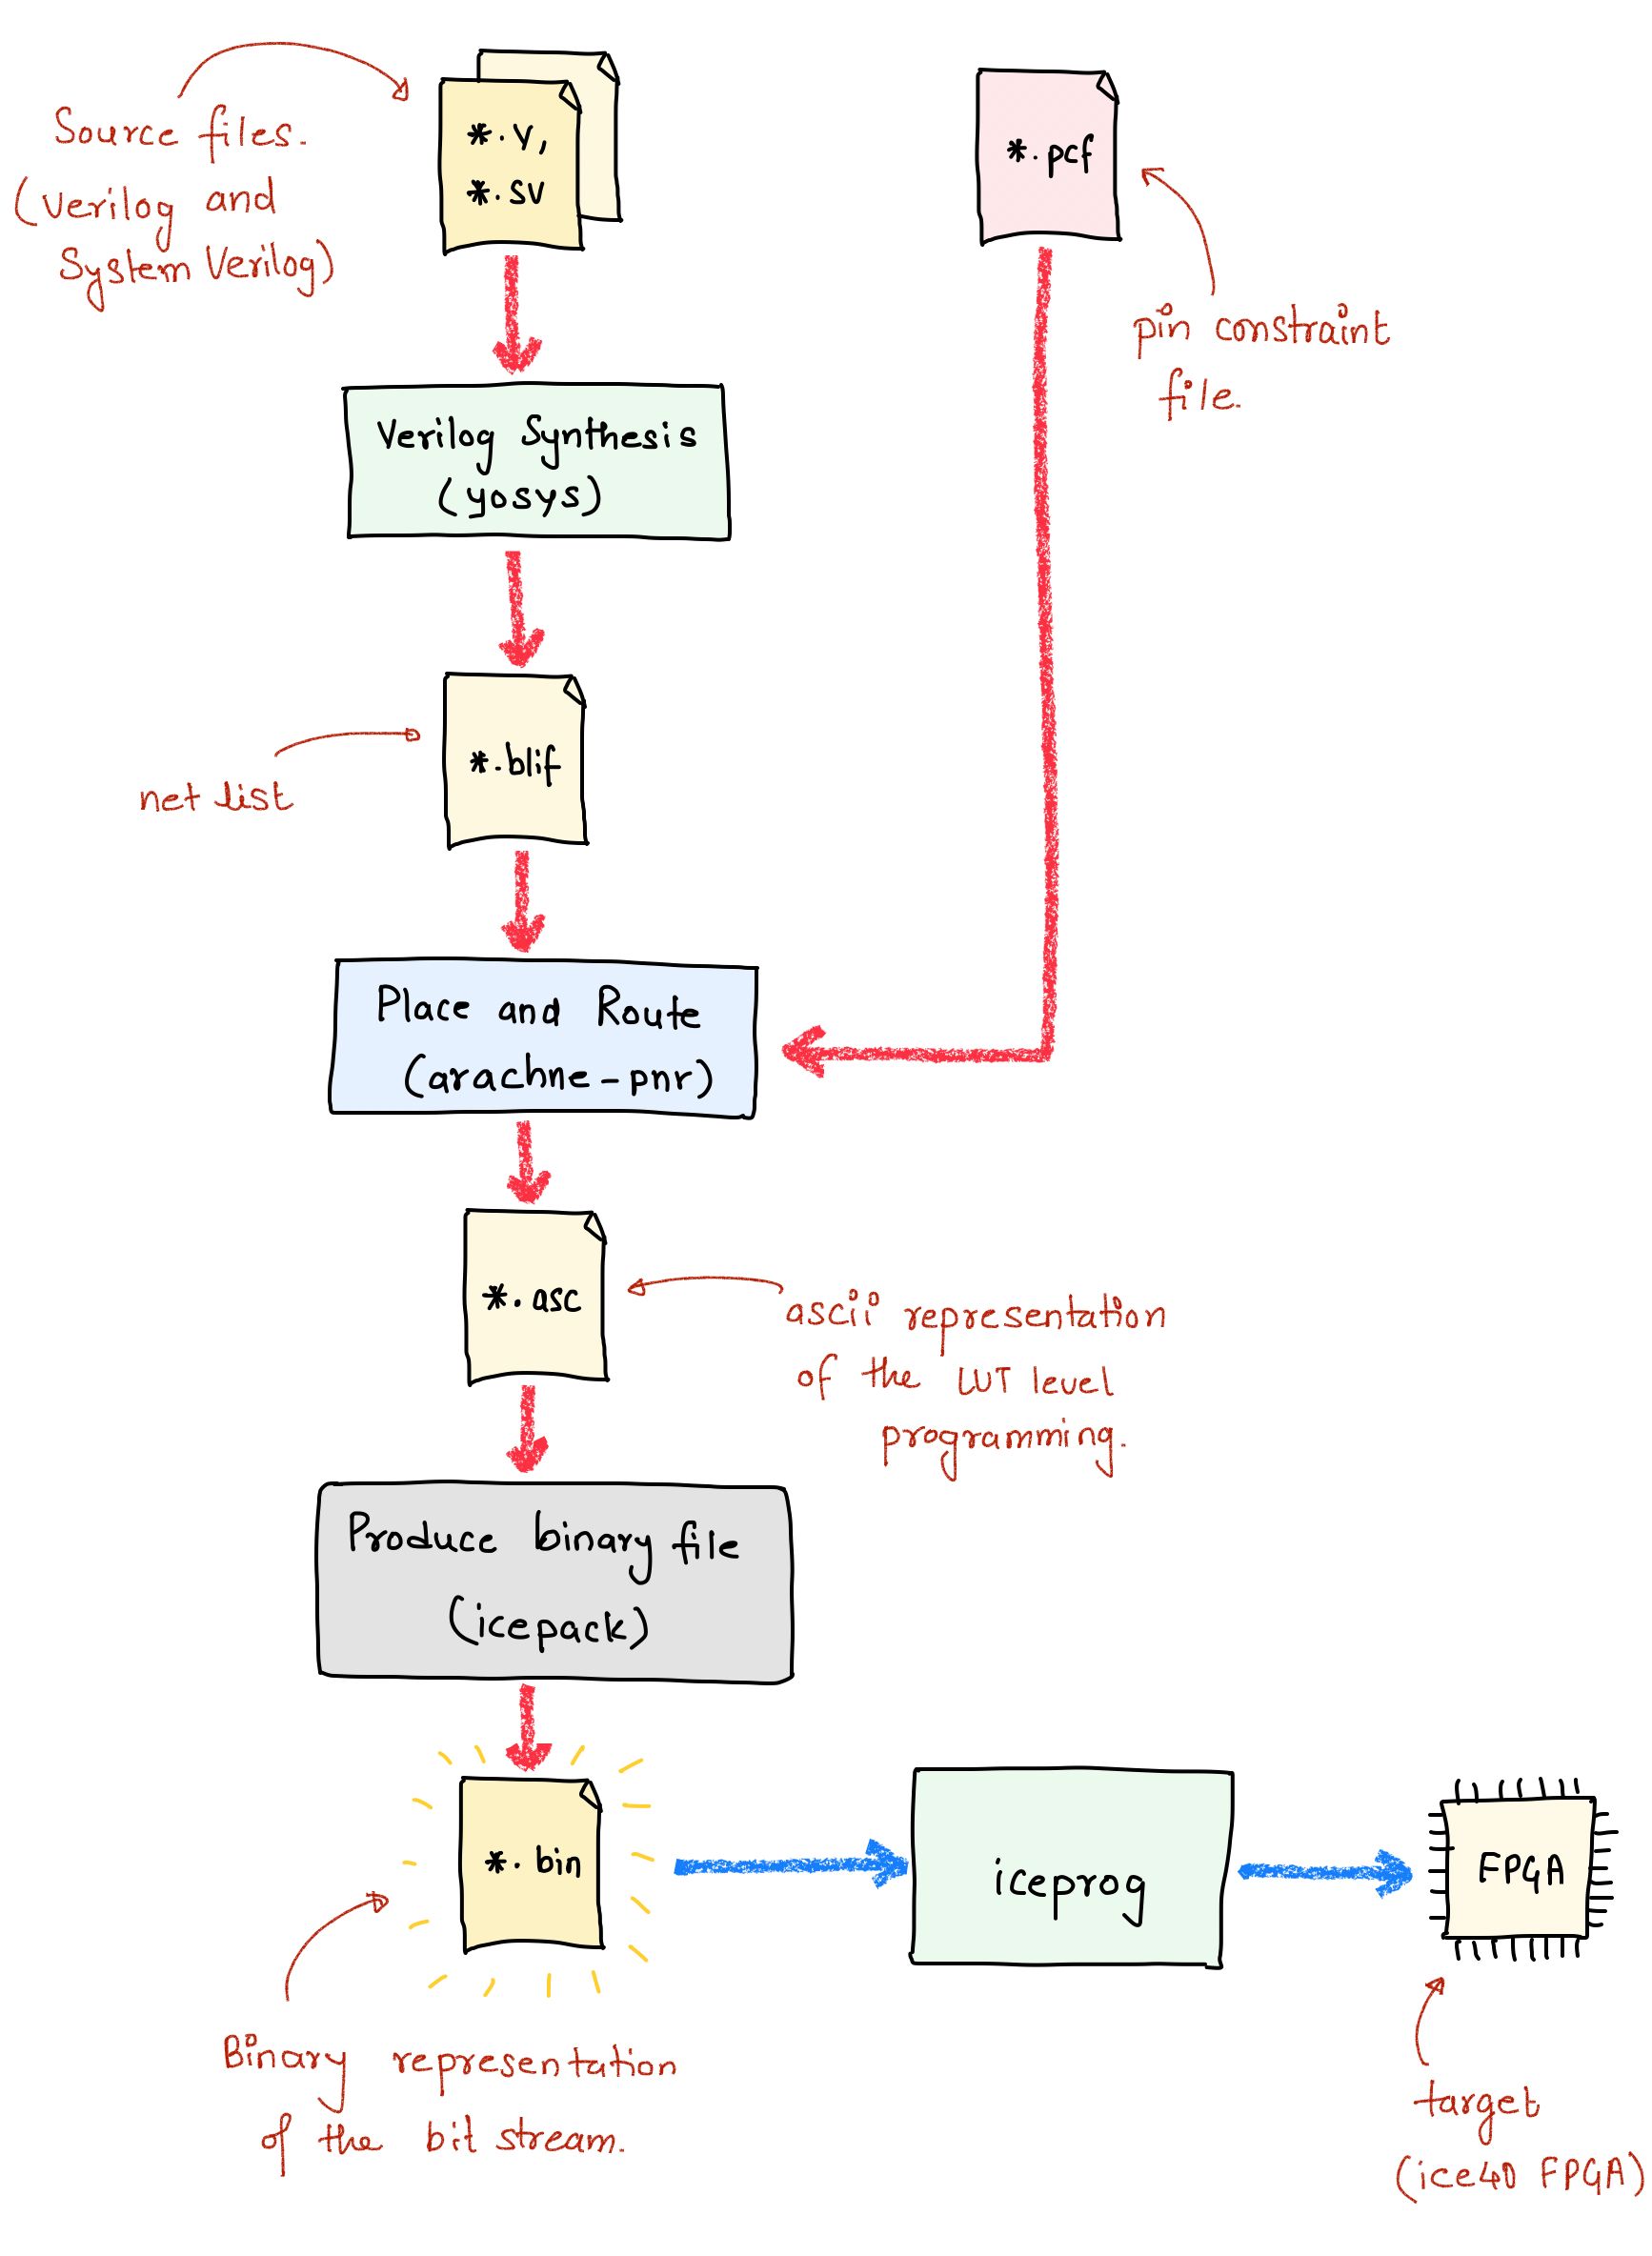
The Verilog-based description needs to be converted into a stream of 0s and 1s that the FPGA can use to reconfigure itself. Each FPGA provider has an associated toolchain. In our case, we use the open-source toolchain. This toolchain includes a Verilog to netlist converter, netlist to place and route, generation of the binary file, and utilities to load binary on the FPGA. As below -
Development Flow
We feed .v file into the yosys which shall do verilog synthesis for us to produce .blif file. This file represents the described circuit in a format that can be consumed by the place and route tool.
Then we feed .blif and .pcf files to arachne-pnr to produce a .asc file. Arachne-pnr is the place and route tool. It lays out the structure of how the various blocks within FPGA will be connected to realize the circuit. The .asc file is the ASCII output of the placement and routing plan. It holds information about which Logic Blocks connect to one another and which Switching Box is used.
We then put the .asc file into icepack utility which produces the .bin file which we use to program the FPGA. The .bin has what I referred to earlier as the "bit-stream". As the name goes, it is just a sequence of bits. When we program an FPGA we send this sequence of bits to it, and the programmer on the board accepts the incoming bits and loads the SRAM (don't bother if you don't know what that means :)) of the FPGA.
Finally, we connect the FPGA stick into the USB port. And feed the .bin file into iceprog utility which would program the FPGA.
Demo
Let us now describe the blinky hardware to blink the LEDs on the board. We will use the input clock on the FPGA as a way to add delays between the On/Off of the LEDs. We essentially will build a counter that counts the clock cycles.
❗
The input clock on the FPGA is fed through the physical pin #21 on the FPGA chip. This information is fed in as part of the .pcf file later.
Install dependencies
Folks in the open-source community have taken the time and effort to reverse-engineer the bit-stream format (more on this in a while) of the lattice iCE40 FPGA series (Read more about the entire project IceStorm here).
To install the toolchain you have to be on a Linux machine (You can also do this on Mac and on Linux subsystem on Windows). I am on macOS 13.3.1 as I write this article and I have also tried this on Ubuntu 22.04.2 LTS.
To install the dependencies, open a terminal and execute the following on the prompt. On a Linux system use the following -
Use this command on Mac to install the dependencies. Note that this uses homebrew as the package manager.
This will install all the required utilities for the components of the toolchain to work.
Install Toolchain
We would now want to get the toolchain! Use the following to build it from the source and install all the utilities on the local machine. These commands are the same for both - Linux and macOS.
IceStrom tools
These utilities help us convert between file formats and program the FPGA.
git clone https://github.com/cliffordwolf/icestorm.git icestorm
cd icestorm
make -j$(nproc)
sudo make install
Place and Route Tool
arachne-pnr is the place and route tool. Given a netlist, this tool figures out how to map that to the resources on the FPGA.
git clone https://github.com/cseed/arachne-pnr.git arachne-pnr
cd arachne-pnr
make -j$(nproc)
sudo make install
Synthesis Tool
yosys is the open-source synthesis tool. It can process the hardware description language like Verilog and System Verilog and convert it to a netlist. The netlist is then consumed by the place and route tool.
git clone https://github.com/cliffordwolf/yosys.git yosys
cd yosys
make -j$(nproc)
sudo make install
The Blinky circuit
Create three files - Makefile, blinky.v and blink.pcf. These are normal text files and you can use any editor of your choice to edit these. Populate the files with the content below -
Don't Miss an Update!
Helping you navigate the Embedded Systems career with ease! Technical posts, newsletters, special offers, and more.